Thursday, January 28

week4: bathroom art

i'm finally starting to hang things on the walls here in unit 12. STARTING. i'm really looking forward to having at least one room in this place finished, yaknow? one day soon. anyway, with the wall stuff, i decided to start in my bathroom because... well, it's the closest to being done i guess. half of it is anyway. (the shower and commode are in one room, while the sink and vanity are just outside. very 80s.) both halves are pretty small, and the sink half is sort of stuck at the end of a short hallway without a proper door or anything. it's all a bit weird. anyway, the bottom line is, it's small and slightly awkward. oh, and all the hardware & finishes (save the faucet) seem to be original to the condo (vintage: 1981). blah blah boring ugly brass faded wood neutral. ugh. not helping the smallness or awkward-ness of the space at all.

so. i decided to go the complete opposite direction. i wanted lots of color and pretty touches to make the space feel special and intentional, fun and personality-ful. (i just made up that word.)

for this bathroom my inspiration came from the packaging of a bottle of soap that my sis gave me a few years ago. i just loved the design so much! (see it here) so the shower half got painted the medium teal tone, as well as the walls around the vanity in the other half. the hallway got the lighter, minty green. and the final touch is red for the accessories. there's also plenty of white and silvery metal.

the whole bathroom isn't done yet, unfortunately (though the remodel is on the short list). but the shower half of the bathroom is almost there. (i still need to replace the exhaust vent, the switches and the door hinges, and also paint the ceiling & trim and touch up the walls. but anyway.)

so i recently added some art and little decorations. which is where this whole post started. now, to the pics!

IMG_3594

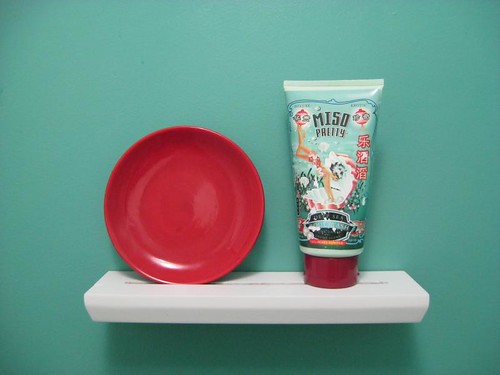
teal wall, small white shelf, round red plate (which cost all of 98 cents thankyouverymuch), and the inspirational body wash package itself.

IMG_3595

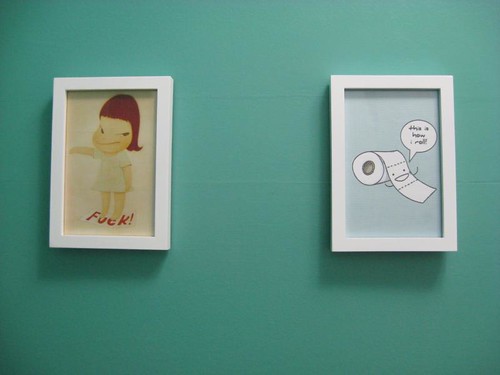
teal wall again, two small prints in white frames. on the left, a postcard print by yoshitomo nara, and on the right, artwork by yours truly. (it says "this is how i roll!". silly, i know.)

IMG_3597

somewhat wider view. the bathroom had ugly sliding doors on the shower when we bought it, which we promptly removed and replaced with a curved shower rod and nice white curtain. please disregard the ugly exhaust vent and teal paint oops'ed on the ceiling. i also need to replace the switches, which are some kind of almond color with paint swiped all on them. sigh.

anyway, that's all i got so far. hoping to get the rest of the bathroom done soon, as well as the second bathroom too!

Monday, January 25

blackberry sleeve

this was a little project i cooked up out of necessity. about a week or so before christmas, i lost the small faux leather sleeve that came with my blackberry. looked for a replacement online, but unwilling to pay $25 or more for one. enter my new sewing machine, an awesome christmas present from my parents! hadn't used one myself in years, so i needed a relatively quick and easy project to get started with the new machine. thus, i decided to try to make a small sleeve for my blackberry.

i of course turned to google for inspiration and instruction, and read through several tutorials before picking this one from sew mama sew to use as a base. i had fabric scraps and batting lying around from other projects, and thread in my small stash of sewing supplies, so this project cost me nothing. even better!

i simplified sew mama sew's pattern a little more to make it easier on myself by omitting the flap that folds over the top and also the button & elastic closure. instead, i made mine like a little pocket, open at the top. (that's how the original one was so i figured it would work ok.) i also modified the measurements to fit my phone exactly so it would be snug in the pocket.

other than the fact that i cannot sew a straight line to save my life, i think this turned out pretty well! especially considering it's the first thing i've sewn all by myself since high school (or maybe earlier). i was also able to finish it in an afternoon, including time to set up the sewing machine and read the instruction manual, plus a little practice stitching.

IMG_3541

IMG_3540

Wednesday, January 20

week3: entertainment center hack

this week's post will be about some modifications we made to our media console. we got it from west elm, it was the perfect size and style that we wanted. but it was actually intended to be a sideboard or buffet, so it did not have any accommodations for cables, cords and wires. this is what our setup looked like:

IMG_3570

cords all over the place, speakers on the floor, components in disarray. oh, and a hinge on one of the doors came off, leaving a hole in the side. yeah.

so the plan was simple: drill two holes in the back to allow for cords: one near the outlet and one near the top (for all the cords that connect to the tv itself). reconfigure the components so they could all fit inside. place speakers on new speaker stands (which were a christmas gift). and fix the hole in the side and reattach the door. i also took this opportunity to replace the outlet and cover behind the console.

we used a cordless drill and a 1.5-in spade bit to to make the holes. (we practiced first on a piece of plywood to make sure the holes would be large enough for the plugs/cords to pass through.)

IMG_3571

then we sanded down the edges of the holes to eliminate any splinters or rough edges.

IMG_3573

IMG_3574

sean reconnected all the components, including some that were formerly on top the console. and we assembled the speaker stands that he got for christmas (warning: this was much more difficult than expected and involved some colorful language).

IMG_3576

finally, we fixed the hole where the hinge needed to attach using toothpicks and wood glue, then reattached the door. ET VOILA!! much better!!

IMG_3592

as an extra bonus, we get much better sound through the speakers now that the carpet-muffling effect is eliminated. nice!

Thursday, January 14

week2: recipes

recipeeeeeeeeeees!

made 2 new things from this month's cooking light. leek and potato soup from jamie oliver's latest book and "grown up grilled cheese sandwiches" from CL's enlightened cook section. both were good. the leek potato soup isn't much different from other recipes i've made though. *shrug* the grilled cheese sammiches were really good though, and fast and easy too!

Leek and Potato Soup

IMG_3563

2 leeks
6 c chicken broth
2 tbs olive oil
3 c coarsely chopped onion
1 c chopped carrot
1 c chopped celery
2 garlic cloves, minced
2 c cubed, peeled yukon gold potatoes
1/2 tsp pepper
1/4 tsp salt

1. discard roots, outer leaves and tops of leeks. cut remainder in half lengthwise then slice into half moons. rinse thoroughly in cold water; drain.
2. bring broth to broil.
3. heat oil in dutch over. add leek, onion, carrot, celery and garlic. partially cover and cook 20 mins or until veggies are tender, stirring occasionally. add hot broth and potatoes; return to boil. cover, reduce heat, and simmer 10 mins or until potato is tender. season with salt & pepper. Serve chunky or puree with immersion blender.

Grown Up Grilled Cheese Sandwiches

IMG_3567

(i modified this one somewhat)

cooking spray
1 c sliced red onion
1 large garlic clove, sliced or minced
8 slices bread
spicy brown mustard
1 c shredded cheddar cheese
2 c spinach leaves
8-12 slices bacon, cooked

1. spray skillet with cooking spray and heat; add onion and garlic and cook til golden brown and tender, about 10 mins, stirring occasionally.
2. spread each of 8 bread slices with mustard; sprinkle 2 tbs cheese each over 4 of them. top those with 1/2 c spinach, 2 tbs onion mixture and 1+1/2 or 2 bacon slices. sprinkle with 2 tbs cheese; top with remaining bread slices.
3. heat skillet and coat with cooking spray. cook each sandwich 3 min per side or til golden brown and cheese melts.

Saturday, January 9

gossip bench

not too long after we made an offer on the condo, i became obsessed with finding the right piece of furniture for the entryway. i wanted someplace where we could drop our keys and the mail and don/doff boots and outerwear, especially in the winter. after seeing a post about gossip benches on apartment therapy, i was hooked and began trolling craigslist and ebay for the perfect bench.

well, it took a few months (and a brief but torrid dalliance & infatuation with some old theater seats), but i finally found my bench on ebay! sean and i drove out to stratford CT to take a look and bring it home!

bench1

(pic from ebay listing)

it could stand to be refinished, which i may/probably will do one day, but it's solid and has lovely lines. i gave it a good cleaning then placed it in its new home.

IMG_3286

IMG_3288

(pics from our entry)

a few weeks later when i had the time, i removed the seat, which still had the original upholstery, and recovered it. i wrapped it in batting (for cushion) and a fun fabric, leaving the original upholstery intact underneath.

IMG_3289

IMG_3291

i'm pretty happy with it! and it's perfect for putting on/taking off shoes on our way out/in. (we don't wear shoes in the house.) gotta love a quick and easy project! refinishing it, on the other hand, will probably be a bit more time-consuming.

Thursday, January 7

2010 week1

ok, enough oh-nine recap, i think it's time to talk about oh-ten.

here are some things i want to do this year:

1. learn to use my new(er) camera better, and post photos every week.
IMG_3559

(that would be my camera's instruction guide)

2. keep on running! i kinda quit doing this after we moved, but i want to get back into it. i'm debating signing up for a half marathon this year but not ready to commit to that just yet...

IMG_3553

(training watch and book about the nyc marathon, both of which i got for xmas)

3. make one new recipe per month and post the recipe and photo.

4. project posts! i have plenty of projects these days, just need to post about them when i do them.

so there they are. wish me luck!

Tuesday, January 5

dear future homeowners (doorknob edition)

[i know we won't live in the condo forever, so i wanted to take the opportunity to fill in the future owners of unit 12 on a few little details. you know how you move into a place, and you think, "why on earth did the previous owners do THAT?" or "well, THAT would have been nice to know BEFORE i cut a hole through the drywall"? yeah.]
so, the doorknobs. this past weekend, the first of 2010, i replaced most of the interior doorknobs in the condo, because the previous ones were old, ugly and mismatched. the deadbolt on the front door also needs to be replaced but i haven't done that yet. also, the key to the lower doorknob also opens the storage unit, fyi.

regarding the interior doorknobs:

1. the right-hand screw on the knob to the closet in the master bedroom doesn't match. i'm sorry. if you noticed this already, i'll give you five bucks. apparently the internal threads on that side were borked, so the screw that was supposed to go there would not go in all the way, and it looked dumb sticking out. not to mention posed a threat to our knuckles. so i used a shorter screw from one of the old doorknobs instead, which is bronze-y instead of silver-y like the new door hardware, to secure the knob. i hope you can forgive me.

2. the knobs on the french doors from the living room are dummies.

3. i also replaced the handles on the bifold closet doors in the entry and hallway. (the old ones were really ugly. maybe i should make a little time capsule for you and hide it in the attic somewhere. i could include all the vestiges of the condo's former life. it would be weird.)

that's all for now!

yours,
truly

IMG_3551

Monday, January 4

2009 week one revisited

In my first post of 2009, I mentioned a few goals for the year, and before I get too far into 2010, I thought I'd check back on my 2009 goals and see how I did. What can I say, I like to live dangerously.

Keep in close touch with family and friends.

i'd give myself a C on this. I'm not sure I did much better than I have in the past. There's room for more improvement. But just for kicks, here's a shot of this year's holiday cards.

IMG_3548

Go see more music.

I don't get more than a C on this either. The condo mess kinda got in the way of things like this, so it's not entirely on me, but still.

Eat dinner at the dinner table.

I get an A for this one. Most nights we eat at the table, though we still cheat and use the coffee table in the living room sometimes. OK, maybe I get a B+.

Finally, I hope, when I start getting the Christmas stuff back out again, it will be in our very own house!

A+, mission accomplished. :) And we got a real live Christmas tree this year:

IMG_3473

Next up, my 2010 "goals"...

Sunday, January 3

long time, no blog

i think it's safe to say i did not succeed at my weekly photo project last year. mid-year, we finally closed on the condo and moved, and i just couldn't get into a regular groove of taking pics and posting them after that, so i sort of called it quits. but i'm back and i'm at it again, giving project 52 another shot (get it?).

also in the works, i revisit my new year's resolutions from 2009 and then kinda maybe sorta think about a few for 2010. i also have pics from a couple of small projects i did in the condo last year that i'd like to post.

let's see how far i make it this year, shall we?